
SendGrid recently announced they’re discontinuing their free Email Plan, forcing developers to migrate to paid plans. I wanted to move off of the Email Parser because I’m not sure if that will be paid only as well. If you’re looking for a cost-effective alternative, Cloudflare Workers provide an excellent solution for parsing and forwarding emails to your API.
Why Choose Cloudflare Workers?
- Free Tier: 100,000 requests per day at no cost
- Global Distribution: Low latency worldwide
- Easy Setup: Deploy in minutes
- Full Control: Customize parsing logic as needed
- Reliable: Built on Cloudflare’s robust infrastructure
Prerequisites
Before starting, ensure you have:
- A Cloudflare account (free tier works fine)
- A domain managed by Cloudflare
- Node.js installed locally
- An API endpoint to receive parsed emails
Step 1: Clone and Customize the Project
Important: This project uses “Mailvoid” as an example name. You’ll want to rename everything to match your application.
git clone https://github.com/timothydodd/mailvoid-cloudflare-worker.git
cd mailvoid-cloudflare-worker
Rename for Your Project
Since “Mailvoid” is specific to the original project, customize the naming:
- Update
package.json:
{
  "name": "your-app-email-forwarder",
  "description": "Cloudflare Worker to forward emails to YourApp API"
}
- Update
wrangler.toml:
name = "your-app-email-forwarder"
- Rename environment variables (optional but recommended):
MAILVOID_API_URL→YOUR_APP_API_URLMAILVOID_API_KEY→YOUR_APP_API_KEY
Step 2: Customize the Worker Code
The main worker code is in src/index.js. Here’s what it does:
Email Processing Flow:
- Receives email via Cloudflare’s email routing
- Extracts content from the raw email stream
- Structures data into JSON format
- Forwards to your API with proper headers
- Handles errors gracefully
Key Features:
- Extracts all email headers
- Reads raw email content
- Includes sender/recipient information
- Comprehensive error logging
- Configurable API endpoint
Required Code Changes:
1. Update Environment Variable Names (if you renamed them):
In src/index.js, change lines 42 and 59:
// Change this line:
if (!env.MAILVOID_API_URL) {
// To:
if (!env.YOUR_APP_API_URL) {

// And change this line:
const response = await fetch(env.MAILVOID_API_URL, {
// To:
const response = await fetch(env.YOUR_APP_API_URL, {

// And change this line:
'X-Api-Key': env.MAILVOID_API_KEY,
// To:
'X-Api-Key': env.YOUR_APP_API_KEY,
2. Customize API Headers: Modify the fetch request headers in src/index.js:55-61:
const response = await fetch(env.YOUR_APP_API_URL, {
  method: 'POST',
  headers: {
    'Content-Type': 'application/json',
    'X-Api-Key': env.YOUR_APP_API_KEY,  // Change this header name
    'User-Agent': 'Your-Custom-Agent/1.0'
  },
  body: JSON.stringify(emailData)
});
3. Modify Email Data Structure: Update the emailData object in src/index.js:34-40:
const emailData = {
  from: message.from,
  to: message.to,
  subject: message.headers.get('subject'),  // Add subject extraction
  headers: Object.fromEntries(message.headers),
  raw: emailContent,
  rawSize: message.rawSize || emailContent.length,
  timestamp: new Date().toISOString()  // Add timestamp
};
Step 3: Upload Your Customized Project to GitHub
After making your customizations, create your own GitHub repository:
# Initialize git if not already done
git init

# Add your changes
git add .
git commit -m "Initial commit with customizations"

# Create a new repository on GitHub and push
git remote add origin https://github.com/yourusername/your-app-email-forwarder.git
git push -u origin main
Step 4: Setup Worker on Cloudflare
Instead of using the CLI deployment, we’ll use Cloudflare’s GitHub integration for easier management:
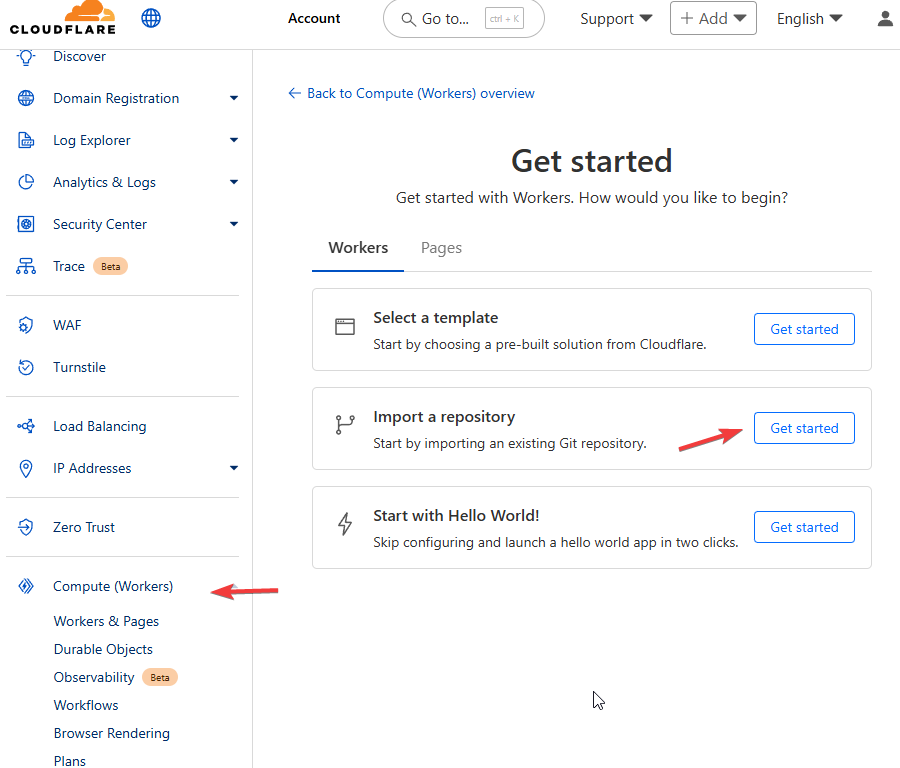
Deploy via Cloudflare Dashboard
- Go to Cloudflare Dashboard > Workers & Pages
- Click Create Application
- Select Pages tab > Connect to Git
- Connect your GitHub account if not already connected
- Select your repository with the worker code
- Configure the build settings:
- Project name: your-app-email-forwarder
- Production branch: main
- Build command: Leave empty (not needed for workers)
- Build output directory: Leave empty
- Click Save and Deploy
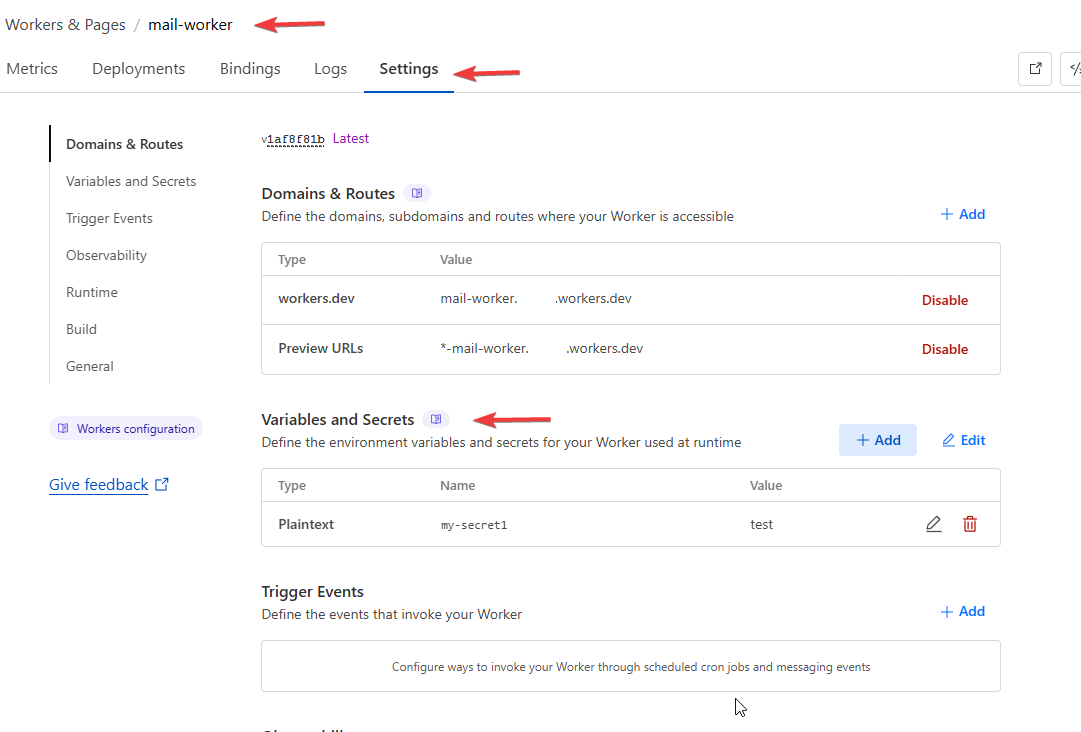
Configure Environment Variables
- Go to your project settings in Cloudflare Dashboard
- Navigate to Settings > Environment Variables
- Add your variables:
MAILVOID_API_URL(or your renamed version): Your API endpointMAILVOID_API_KEY(or your renamed version): Your API key
- Click Save
Step 5: Configure Email Routing
Note: Since we’re using Cloudflare’s GitHub integration, the deployment and configuration is handled automatically. You don’t need to manually run deployment commands.
Setup Email Routing in Cloudflare Dashboard
Now that your worker is deployed, connect it to email routing:
- Go to Email Routing in your Cloudflare Dashboard
- Click Get Started and verify your domain
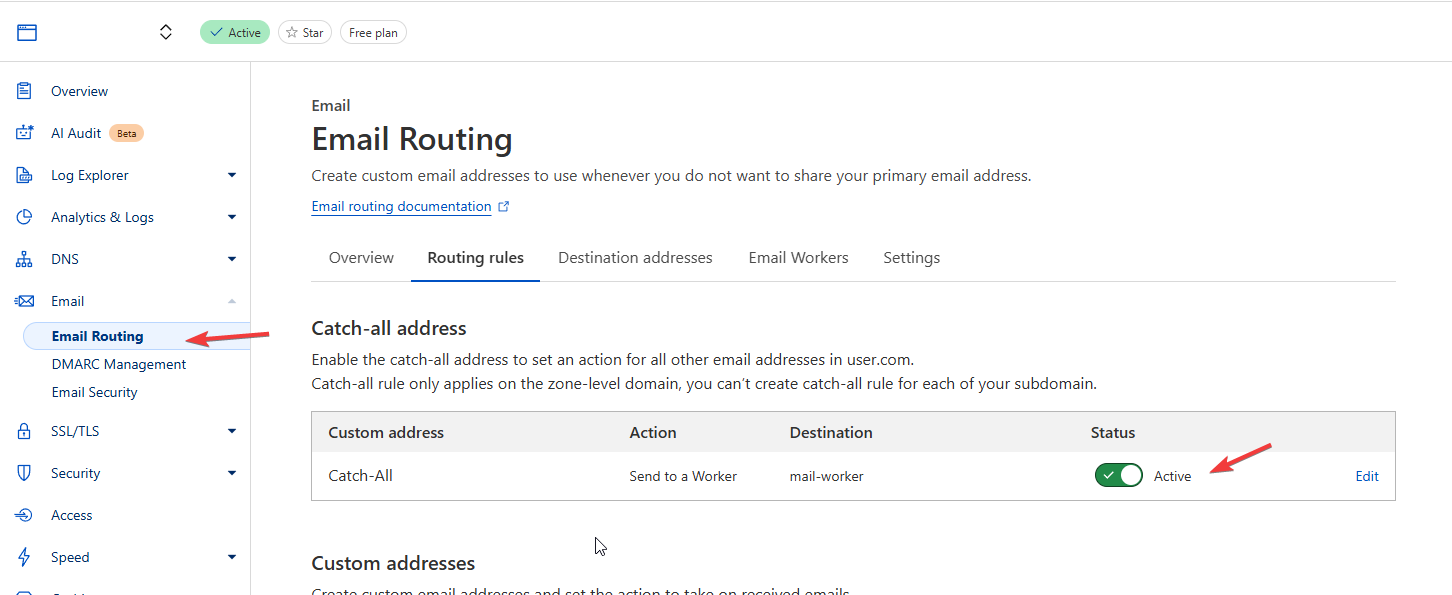
- Navigate to Routing Rules
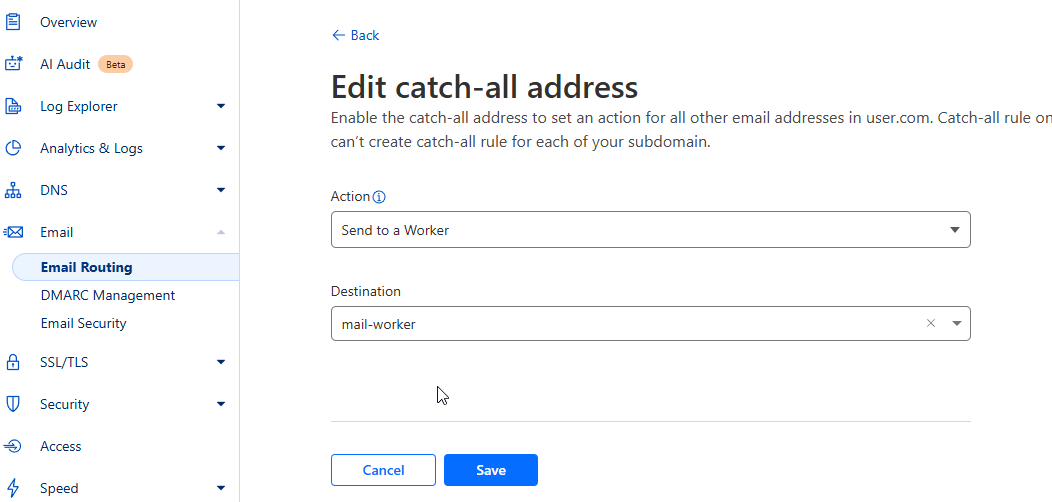
- Enable Catch-all Address:
- Toggle on the catch-all address option
- This will capture all emails sent to your domain
- Configure Action:
- Select Action: “Send to Worker”
- Select Worker: Choose your deployed worker from the dropdown
- Save your routing configuration
Step 6: Test Your Setup
Local Testing
Test the worker logic locally:
node test-email.js
Live Testing
- Send an email to any address at your domain
- Check worker logs:
wrangler tail - Verify your API received the parsed email
Monitor Logs
Watch real-time logs during testing:
wrangler tail --format=pretty
Expected Email Data Format
Your API will receive emails in this JSON structure:
{
  "from": "[email protected]",
  "to": "[email protected]",
  "headers": {
    "subject": "Email Subject",
    "content-type": "text/plain; charset=utf-8",
    "dkim-signature": "v=1; a=rsa-sha256; ...",
    "received-spf": "pass",
    "x-spam-score": "0.1"
  },
  "raw": "Full raw email content including headers and body",
  "rawSize": 1024
}
Troubleshooting
Common Issues:
1. Environment Variables Not Set
Error: MAILVOID_API_URL not configured
Solution: Double-check your environment variables are set correctly.
2. API Endpoint Unreachable
Error: Failed to forward email: 500
Solution: Verify your API endpoint is accessible and accepts POST requests.
3. Email Not Routing to Worker
- Ensure email routing is enabled in Cloudflare Dashboard
- Check that your routing rules match the email pattern
- Verify your domain’s MX records are set correctly
4. Worker Not Receiving Emails
- Check the worker is deployed and active
- Verify the email routing custom action points to your worker
- Test with
wrangler tailto see if requests reach your worker
Debug Mode
Enable verbose logging by adding console.log statements:
console.log('=� Email received:', {
  from: message.from,
  to: message.to,
  headers: Object.fromEntries(message.headers)
});
Advanced Customizations
Add Email Parsing
Extract specific content from emails:
// Parse HTML content
const htmlMatch = emailContent.match(/Content-Type: text\/html[\s\S]*?\n\n([\s\S]*?)(?=\n--|\n\r\n|\Z)/);
const htmlContent = htmlMatch ? htmlMatch[1].trim() : null;

// Parse plain text
const textMatch = emailContent.match(/Content-Type: text\/plain[\s\S]*?\n\n([\s\S]*?)(?=\n--|\n\r\n|\Z)/);
const textContent = textMatch ? textMatch[1].trim() : null;
Add Attachment Detection
const hasAttachments = emailContent.includes('Content-Disposition: attachment');
const attachmentCount = (emailContent.match(/Content-Disposition: attachment/g) || []).length;
Add Spam Filtering
const spamScore = message.headers.get('x-spam-score');
const spamThreshold = 5.0;

if (spamScore && parseFloat(spamScore) > spamThreshold) {
  console.log('=� Email rejected: spam score too high');
  message.setReject('Spam detected');
  return;
}
Production Considerations
- Error Handling: The worker includes comprehensive error handling and logging
- Rate Limiting: Cloudflare handles this automatically
- Scalability: Workers scale automatically with your email volume
- Monitoring: Use Cloudflare Analytics to monitor worker performance
- Security: API keys are stored securely as environment variables
[Screenshot: Cloudflare Analytics dashboard showing worker performance metrics and request volume]
Conclusion
Migrating from SendGrid Parse to Cloudflare Workers provides a robust, cost-effective solution for email parsing. With the free tier handling 100,000 requests daily, most applications will run at zero cost while gaining better performance and control over their email processing pipeline.
The setup process takes less than 30 minutes, and you’ll have a production-ready email parser that can handle your application’s growth without the recurring costs of traditional email parsing services.
Repository: mailvoid-cloudflare-worker
Questions? Open an issue on the GitHub repository for support and feature requests.