
In today’s interconnected world, MQTT (Message Queuing Telemetry Transport) has become an essential protocol for IoT devices and applications requiring lightweight messaging. Eclipse Mosquitto, a popular open-source MQTT broker, provides a reliable and efficient implementation of this protocol. In this guide, I’ll walk you through setting up Mosquitto on a K3s Kubernetes cluster, making it accessible from your network, and ensuring your data persists beyond container restarts.
Prerequisites
Before we begin, make sure you have:
- A running K3s cluster (if you don’t have one yet, check out the official K3s documentation)
- kubectl configured to communicate with your cluster
- MetalLB installed for LoadBalancer support (see my guide to setting up MetalLB)
- Optional: NFS server for persistent storage (see my guide to NFS setup)
Understanding the Manifests
Let’s start by examining the manifest files we’ll be using to deploy Mosquitto
Deployment Manifest
apiVersion: apps/v1
kind: Deployment
metadata:
  name: mosq
  labels:
    app: mosq
spec:
  replicas: 1
  selector:
    matchLabels:
      app: mosq
  template:
    metadata:
      labels:
        app: mosq
    spec:
      containers:
        - name: mosq
          image: eclipse-mosquitto:latest
          ports:
            - containerPort: 1883
              name: web
            - containerPort: 9001
              name: service
          volumeMounts:
            - name: mosq-volume
              mountPath: /mosquitto/data
              subPath: data
            - name: mosq-volume
              mountPath: /mosquitto/log
              subPath: log
            - name: mosq-volume
              mountPath: /mosquitto/config/mosquitto.conf
              subPath: config/mosquitto.conf
      volumes:
        - name: mosq-volume
          nfs:
            server: 192.168.10.50
            path: /data/kubernetes/mosquitto
            readOnly: no
This manifest creates a Kubernetes Deployment that:
- Uses the official Eclipse Mosquitto image
- Exposes ports 1883 (MQTT) and 9001 (WebSockets)
- Mounts three important directories from an NFS share:
/mosquitto/data: Where persistence information is stored/mosquitto/log: Where logs are written/mosquitto/config/mosquitto.conf: The configuration file
Service Manifest
apiVersion: v1
kind: Service
metadata:
  name: mosq-lb
spec:
  selector:
    app: mosq
  ports:
    - port: 1883
      targetPort: 1883
      name: http
    - port: 9001
      targetPort: 9001
      name: service
  type: LoadBalancer
  loadBalancerIP: 192.168.10.100
This manifest creates a Kubernetes Service that:
- Selects pods with the label
app: mosq - Exposes the MQTT port (1883) and WebSockets port (9001)
- Uses the LoadBalancer type to make these ports accessible from outside the cluster
- Specifies a static IP address (192.168.2.231) for the service, which MetalLB will assign
Deployment Steps
1. Prepare the Configuration File
Before deploying Mosquitto, you need to create a configuration file. The default configuration doesn’t allow external connections, so we’ll create a custom one.
First, create a directory on your NFS server at /data/kubernetes/mosquitto/config/ and add a file named mosquitto.conf with the following content:
persistence true
persistence_location /mosquitto/data/
log_dest file /mosquitto/log/mosquitto.log
listener 1883
allow_anonymous true
This configuration:
- Enables persistence and specifies where to store data
- Sets up logging to a file
- Opens the MQTT port on 1883
- Allows anonymous connections (you may want to change this for production)
2. Apply the Manifests
Save the deployment manifest as mosq.yaml and the service manifest as mosq-lb.yaml, then apply them to your cluster:
kubectl apply -f mosq.yaml
kubectl apply -f mosq-lb.yaml
3. Verify the Deployment
Check if the pod is running:
kubectl get pods -l app=mosq
You should see the external IP address (192.168.10.100) assigned by MetalLB.
Alternative: Using a PersistentVolume Instead of NFS
If you don’t want to set up an NFS server, you can use Kubernetes PersistentVolumes instead. Here’s how to modify the deployment for this approach:
1. Create a PersistentVolumeClaim
Save the following as mosq-pvc.yaml:
apiVersion: v1
kind: PersistentVolumeClaim
metadata:
  name: mosq-data-pvc
spec:
  accessModes:
    - ReadWriteOnce
  resources:
    requests:
      storage: 1Gi
---
apiVersion: v1
kind: PersistentVolumeClaim
metadata:
  name: mosq-log-pvc
spec:
  accessModes:
    - ReadWriteOnce
  resources:
    requests:
      storage: 1Gi
---
apiVersion: v1
kind: ConfigMap
metadata:
  name: mosq-config
data:
  mosquitto.conf: |
    persistence true
    persistence_location /mosquitto/data/
    log_dest file /mosquitto/log/mosquitto.log
    listener 1883
    allow_anonymous true
This creates:
- PVCs for data and logs storage (1GB each)
- A ConfigMap for the configuration file
2. Modified Deployment Manifest
Save the following as mosq-pv.yaml:
apiVersion: apps/v1
kind: Deployment
metadata:
  name: mosq
  labels:
    app: mosq
spec:
  replicas: 1
  selector:
    matchLabels:
      app: mosq
  template:
    metadata:
      labels:
        app: mosq
    spec:
      containers:
        - name: mosq
          image: eclipse-mosquitto:latest
          ports:
            - containerPort: 1883
              name: mqtt
            - containerPort: 9001
              name: websockets
          volumeMounts:
            - name: data
              mountPath: /mosquitto/data
            - name: log
              mountPath: /mosquitto/log
            - name: config
              mountPath: /mosquitto/config/mosquitto.conf
              subPath: mosquitto.conf
      volumes:
        - name: data
          persistentVolumeClaim:
            claimName: mosq-data-pvc
        - name: log
          persistentVolumeClaim:
            claimName: mosq-log-pvc
        - name: config
          configMap:
            name: mosq-config
3. Apply the Modified Manifests
kubectl apply -f mosq-pvc.yaml
kubectl apply -f mosq-pv.yaml
kubectl apply -f mosq-lb.yaml  # The service remains the same
Testing the MQTT Broker
Once your Mosquitto broker is up and running, you can test it using MQTT Explorer, a powerful graphical client that makes it easy to interact with your broker.
Setting Up MQTT Explorer
- Download and install MQTT Explorer from mqtt-explorer.com or GitHub (MQTT-Explorer releases)
- Launch MQTT Explorer and create a new connection with these settings:
- Name: K3s Mosquitto
- Host: 192.168.10.100
- Port: 1883
- Protocol: mqtt://
- Click “Connect” to establish a connection with your Mosquitto broker
Publishing & Subscribing to Messages
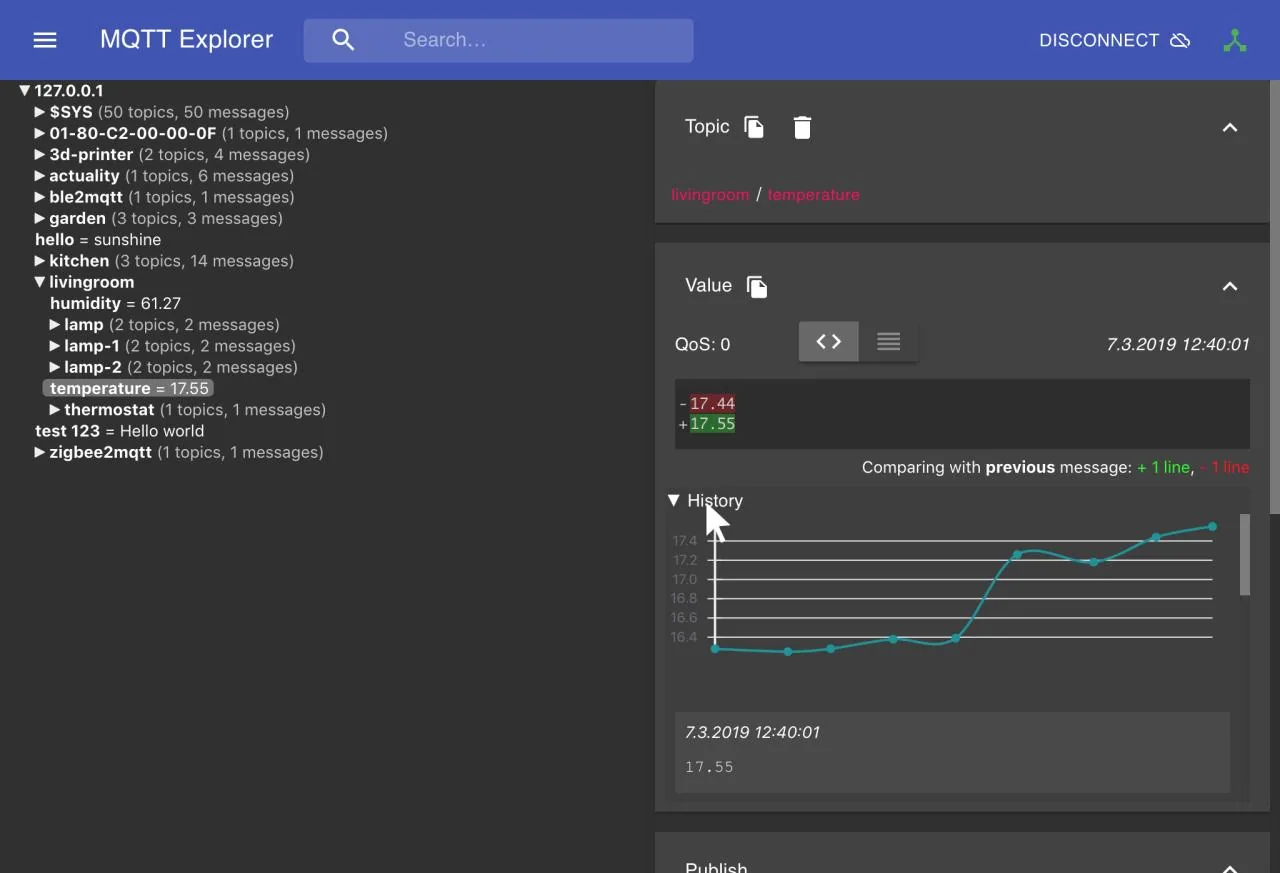
- Subscribe to Topics: MQTT Explorer automatically subscribes to all topics (using the # wildcard). Topics will appear in the left panel as messages are published.
- Publish a Message:
- Click the “Publish” tab in the right panel
- Enter a topic, e.g.,
home/sensors/temperature - Enter a message, e.g.,
{"value": 22.5, "unit": "celsius"} - Click “Publish”
- Observe Real-time Updates: The left panel will automatically update to show your published message. You can expand topics to explore the hierarchy.
- Visualize JSON Data: MQTT Explorer automatically formats JSON messages for better readability and even provides visualization options for numeric values.
The beauty of MQTT Explorer is that it gives you a complete overview of your MQTT ecosystem in one glance, which is especially useful when working with IoT devices that publish to multiple topics.
Conclusion
You now have a fully functional Eclipse Mosquitto MQTT broker running on your K3s cluster! This setup provides:
- A scalable MQTT solution that can handle numerous IoT devices
- Persistent storage for your MQTT data
- External accessibility via MetalLB
- A foundation you can build upon with authentication and TLS for security
For production environments, consider adding:
- Username/password authentication
- TLS encryption
- Access control lists (ACLs)
- Monitoring with Prometheus and Grafana
Happy messaging!